Tuesday, February 16, 2016

Todays Challenge-Tote Bag-Draping Dress -Doggie Billow- 2 fleece and Minky Quilts

I posted a tote bag on my last blog that I was covering on the outside and inside with Clear Plastic.

Everything else on that blog was finished and posted... Nuno felted scarves, and my wonderful blanket type Kwik Sew Minky Coat that really hit the spot this past cold week.   Now I have to get ready for the summer.   I am either going to buy something on the water where I can slide my kayak in or do my ususal 4 weeks near Assateague in cottages on the water.  I haven't decided if I am up to the challenge of purchasing... but I have to decide soon or my cottages on the water will be gone.

This is the same gauge plastic as you can use to make a picture pocket on the outside of a grannie tote to put her grandchildrens pictures in.  I am just totally covering the fabric so I can put wet kayaking clothes in the tote when I am through kayaking.  I ususally layer with a cover up T and shorts and then take them off of the top of my bathing suits and then put on a long lycra dress and go out to dinner when local kayaking or at the beach when I am going to the boardwalk.

So first I will go back to the tote.  It is about 1:00.  Finish it and move on to the Billow etc.

So the outside is covered with the plastic...

The handle is a skin from GStreetFabrics.com that I will shape into a tote handle.

The clear plastic is from GStreetFabrics.com and is sewn in a one piece half yard piece over my very own fabric-with my photos printed on it.
This was made with the regular eco canvas fabric.

The other side is my solo kayaking fabric-Kayakin at sunset

 The inside with be a cotton batik from GStreetFabrics.com... There are many to choose from


Many Batiks to choose from at GStreetFabrics in Rockville, MD   see Google Maps for location to visit...

So you Sew your outside of your Tote....  and then sew it to the clear plastic.... so you have as few holes as possible in the clear plastic... this is the same gauge as the plastic used for photo pockets on Grannie Totes...  Also purchased from GStreetFabrics..... as I work there... most of my fabrics are purchased there, GstreetFabrics site- order on line

unless as in this tote the fabric is something I printed.

Tote outside is made by flat felting a seam between front and back and then sewing the plastic on around the selvage.. the least sewing through the plastic is the best as they are hole punctures that may let water in.

The seam is only in the fabric at one side.... the clear plastic is 54 inches wide so you only have to seam on one side.... so my intent is to seam one side on the outside and oneside on the inside layer and then sew the two sides together...and flip so the batik covered by plastic is on the inside.

The tote handle has many decisions.... if you are putting hard stabilizer interfacing inside the two layers it will practically stand alone with a rectangular side and bottom.... so you can use a long handle or two smaller handles and carry like a purse handle...  I don't use shoulder straps, so I will not be putting that on... but here is how your layouts for the straps look:

This is shorter handles all of these in this color are cut from one small skin sold at GStreetFabrics

There is enough skin to do a long tote handle from one side to the other if you are making Rectangular totes... this will be rectangular... and with stabilizer inbetween

The ends of the tote will look like this when folded rectangular after sewing

If you are doing a shoulder strap you will attach at the top of the side ends

You can also do it in two pieces and use a D-ring so it can be adjusted.

I will be using the shorter handles and it will give me enough left over to do another tote another day, with two small handles....  In the picture you can see how long the leftover half is to be able to go from one side to the other of the tote.


Both Tote handles finished

Now finish the dress.... Change thread and finish Tote....!!!!  7:30 

 Dress is done!.... Now hmmmm... Jacket?... Tote?... Jewelry?...  see my dilemma???.... okay... finish tote... then jewelry and jacket and wear tomorrow.... and do billow and get those quilts off the tables...


For my totes I will be placing the handles here.


I use this pattern for my lycra blouses but have it adjusted to fit me the way I like... Long loose sleeves and I added a bit to the center drape so it drapes more.... I just folded the pattern and put it at a bigger angle in the upper center front... hey, it works for me.....  

so  for this dress... I put the top with the bottom of the simple dress pattern

So again... all those who love my suits, or at least say they do, my suits are different patterns with just a straight skirt with simple kick pleat and an elastic waist.... very comfortable... I keep trying different jacket patterns... and the scarf that matches the blouse that is under the lapels is just a leftover strip of lycra whatever is left...

Bottom-McCalls 4176 and Top Butterick 3131 my old standby

If time, maybe a drapie black Jacket out of some matte jersey I have sitting here.

This dress will be the bottom of the dress above and the top is the usual drape blouse pattern I love and I just overlapped them and cut around.

I couldn't fit the front, so I cut it totally biased so I could fit the front piece.  This is good as it will drape better, but that was the only way I could fit it... There won't be any darts, and no facing, but the back neck facing.. so I will be able to so it up quick now that it is cut out...  I will hang it and take a pic when I totally finish it... I will make covered button earrings and a marble double bracelet out of the scrapes... and I am planning a fused glass pin, if I can find some red and black glass chips in my box of chips and frits.

NOW another cup of coffee and a brownie.....!  Days off are fun...

I have an excuse... I have to do everything that is black thread before I move onto the Doggie Billow, because that is white thread...So  Tote Handle, Dress, then Tote body and Doggie Billow... and thennnnnnnnnn  Quilts... Whew...

OMG! 5:45PM...... Finish Something Kitty!!!!!!:-)) 

Finished one handle and then use for pattern for the second...


The handle ends will be folded under and top stitched in a square and then the square below the rounded handle will be topstitched at each end in the center of the bag as centered here.


The handle itself is turned under and rounded for gripping above the square

Before you start it is faster to not blog, have all your supplies lined up and all your projects lined up and already have eaten your lunch.... :-)) 

Don't forget I am taking pictures as I go tooo!!!

Be Back as I finish the next Two items with pics....OMG! it's 3:15.... time for more COFFEE in my cup...!!!!

Okay... I am all over the place... you know I only have off today and then I have to go back to work tomorrow... so ..

I cut out the sleeves and the back, but I couldn't get the whole back to fit.

As usual the fabric came from the "Treasure Hunt Room" at work at just 2.97 a yard.  That meant I had to take the size piece it was and make it work.   I love the colors and the fabric weight.... soooooo

I had a few pieces cut out to a dress... my typical draping front as my blouses I wear with my suits to work..

I combined 


Dress is done... Fabric from "The Treasure Hunt Room" GStreetFabrics in Rockville -Black Jacket will also be from Treasure Hunting at G

Now.. Jewelry?Jacket?Totes... okay Totes... then jewelry and jacket and wear tomorrow... change thread for totes and back for jacket , then do billow... and then start on quilts and get them off the tables once and for all... 

hopefully all done and mailed by weekend... GOAL... because I want to go do something on FRIDAY.... look at dream house goal... but I can't if I can't finish these things!

Sunday, January 31, 2016

Nuno felting Scarf

Well, Now It has been a while since I posted on this blog.....
I have been sewing my normal wear items, shirts with draping in lycra or Matte Jersey prints and
matching poly poplin suits... that is my every day wear to work.
One thing that has interrupted my blogging is I started working 40 hours a week.  So no real time to blog if I am sewing between working...
I did do some interesting things for Christmas gifts....
NUNO FELTING...
Customers came into the store raving about this methodology and with the extra encouragement from a co-worker I tried it...
So here is a pic of my girls (anonymous facing)  I don't want them to find this blog and be mad that I put them on it for the public to see... so I took their faces out....


So they posed for the pic with their scarves on after they opened them


This is silk chiffon these used white base chiffon and then the fibers felted through the chiffon are actually moreno wool fibers died different colors and slightly varied with some silk fibers...
My Grand daughter thought it was so funny to have the scarves just happen to match their outfits that they had on to visit for Christmas!
Such a Coincidence...
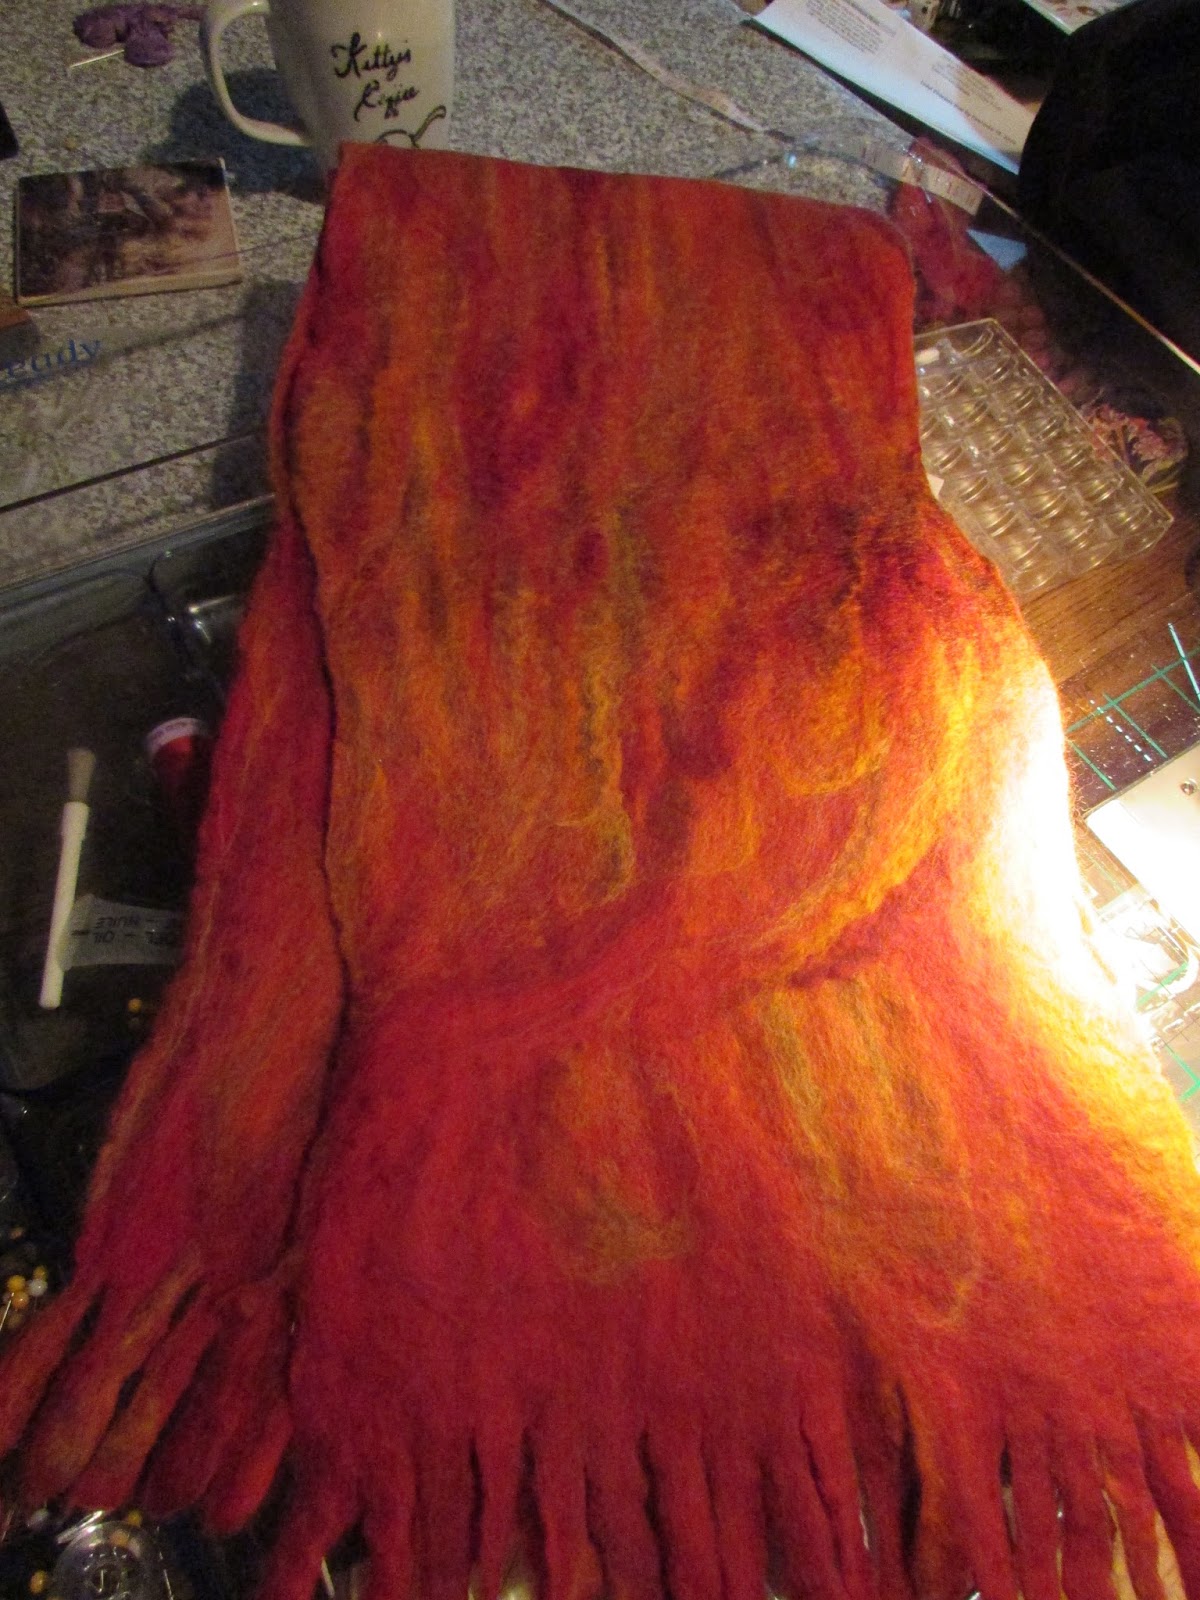
Here is one that I did for my cousin when it was in the drying out stage before I ironed it to send.

You can see the fibers were Red, Orange, Yellow and the
Chiffon on this one was half Orange and half Red

Chiffon from G Street Fabrics and Merino wool fibers from various vendors so I could see which I liked best

Utube videos to teach you different methods 

This was a test to see if you could tell the difference in the color of the chiffon under the fibers and if it mattered that the chiffon was in two pieces at the center

 This is really an experimental phase like making your own fabric.

You could make a shrug out of the chiffon and then do the felting on it.

This shows how vibrant the moreno wool fibers can be after felting into the silk chiffon


Oh Yeah... Grandma got a Silkfaced Brocade Kimono Jacket


That was a quick and easy pattern...Simplicity easy-to-sew

I used the red and black silk-faced brocade because she likes red and black..(coupon+sale discount at G Street for this beautiful fabric.....  well worth it..

This is 3/4 length sleeves(I didn't want her to cook and catch the sleeve on the burner) and I made the jacket short since she is petite.

I have some green in the same type of fabric to make myself a long sleeve one and a pair of pants to match in a solid green.  I will blog it when I do it...


Now I am going to move over to my little sewing card table and lay out a Kwik SEW Coat....K4030 has all sizes in one

Tonight I am going to lay out the same coat in Brown and with Brown and black Leopard Spots on the Fleece.  The only thing is I only have enough to do the collar piece in the fleece I think...so I have some dark Brown Double sided minky and some plain black minky... I am going to try to use the three to create another coat... I love this one soo much and since we moved to the warehouse I tend to wear it when I work if it is chilly.

here I will warm up your memory of the coat I made last year
The collar stands up to protect your ears, so you really don't need a hat or scarf, but I made a scarf of the leftovers and quilted it for fun


Finished-and worn today...


Collar worn flat or up
one side of the coat is Brown Double sided minky-Blanket..ewww
The other side is plain black minky but quilted on to a piece of flat batting before sewing it together... TOTALLY Reversible with big warm pockets!

Kwik SEW Coat....K4030 has all sizes in one

with Pockets..

You may remember the blanket coat I made out of Polar Fleece that had a big collar and then I had to add weight to the color so I used some of my on hand minky and quilted it to the collar and then proceed to do the whole thing so it was reversible-and it has pockets

SOMETIMES THEY DON'T Look anything like the Pattern Picture and maybe even better... Both of these Jacket patterns were very easy and quick.... I LOVE QUICK!

 I thought it looked soo much better than the pattern!

 I have some other things laid out here, but the coat is necessary...some scarf felting materials, a couple of quilts-but quick ones and next after the coat I have to finished this clear plastic covered tote and it will be lined with undetermined, probably batik that i have in blues and then another layer of clear plastic inside.

This is fabric that I had printed of my kayaking view and it will have snakeskin handles

The other side is an evening in Ocracoke on the Sound at Sunset kayaking ..


The line will be ironed out the handle will be shaped and the inside will be lined with fabric and more clear plastic... this is to throw my kayaking clothes in if I am wet and not get my car wet...

Now I will go to work and we will see when I come back what is accomplished


  I ADMIT IT>>>> I LOVE THIS BAG


SUNSET AT OCRACOKE ISLAND SOUND

 I ADDED A POCKET FOR THE WATER BOTTLE AND LINED THE INSIDE WITH BATIK AND A LAYER OF PLASTIC..... LOVE IT

INSIDE AND OUT


Thursday, June 11, 2015

Horse Billow

Thursday, May 21, 2015

Quillows to Billows and Hummingbirds to Horses....

Sooo,
Double Sided Minky(Minkie)  Soooooo soft and Washable

Horse Billow Pillow Pocket
Opposite side of Horse Billow Pillow Pocket
The Blanket of the pillow pocket will fold into this and become a "BILLOW"  or blanket in a pillow-This is the pocket before sewn together

This is what the inside looks like- when attached to the blanket it becomes a place for the new owner to put their feet when using, so all seams are finished with an overcast stitch and seams are about 1/4" stitched straight stitch just inside the overcast seam.
This is pinned together for to test if all is right in size etc.  
Pocket is stitched with the seams meeting and top stitched on top of the right side of the blanket with the opposite side looking like this when opened up
 On double sided minkie both sides feel good, but I consider the extra smooth side to be the right side.   Hemmed edging is about 1.25 turned under twice and then top stitched and then alternating Blanket stitch on your antique embroidery stitches.
Now just fold it together into the pillow pocket like this

The last roll into the pocket just pick up corners of pocket and shake down in and finished it looks like this...
Soft and cozy blanket or pillow.... and two sided
 Either side should look fine... and soft and cozy.....  or get chilly just pull out the blanket and stick your tootsies inside the pillow pocket............hmmmmmmmm  cozy!

Friday, May 15, 2015

I haven't been totally kayaking away.... Check out

Billows...
I have shortened the progress of quillows by producing
BILLOWS...   I had some double sided minky for gifting, so
I am making some BILLOWS...


Blankets fold into pillows....  www.kittysquillows.com in your url will get you the whole process


NOW I AM GOING KAYAKING FOR THE DAY!

Tuesday, May 5, 2015

Where is Kitty Now?

So, why am I not blogging...   check out

One of my other blogs... when the sun is shining!

Yes, I am sewing... just can't do it allll at once.... so when I take pictures of some of the fantastic things I have finished and given... or worn... I will post..  I am getting ready for my vacations, so there will be beach clothes to post, but most importantly I am working on Birthday gifts and special people gifts along with my new fabric designing which keeps me busy but does not keep me away from the sunshine on my brain kayaking!!!
Life without kayaking would be a life missin'!
God wouldn't have made Sunshine and Water if He didn't want us to enjoy it!  
These Heron Agree!!